Anthem’s world of loot is wild and varied, but was recently changed to make loot drops more rewarding and less frustrating.
Today, we’re going to go over the recent patch’s changes, and then explain what all those inscriptions/stats actually mean.
The Update to Loot
Firstly and most pressing, the changes to loot were a welcome addition, significantly reducing the amount of ‘useless’ loot you should receive now. There’s nothing worse than having an epic Masterwork/Legendary weapon drop, and then checking it only to find out it has worthless buffs. Particular examples include my lovely shotgun with a buff to Snipers. Yay?
The update did two things to improve upon this:
- Items will no longer have inscriptions on them that are not appropriate for that specific item. NOTE: This only applies to items obtained after the patch. Items obtained prior to the hotfix will still have the same inscriptions they had before.
- Masterwork crafting costs have been reduced from 25 -> 15 Masterwork Embers. The amount of plants, metal, and parts required for crafting a Masterwork item have also been reduced.
This means that now, all items will drop with relevant buffs. All you need to learn then is what all those inscriptions and stats actually mean, but luckily, I’ve got you covered.
The update also means that crafting Masterwork items is much cheaper. This means that once you’ve unlocked a Masterwork blueprint (by using a Masterwork item enough), you’ll be able to craft new versions of the item to try and get better buffs. That’s really nice, especially if you’re working towards a build with a certain weapon or buff required.
Note that there are more changes coming in the future to improve the %chance rolls in general, so you won’t get any more 0% buffs. The team is also going to make it so that Common and Uncommon (white and green) items can never drop once you hit level 30. That means a massive reduction in useless item drops!
But What Does It All Mean?
That’s all well and good, but what do all of these funky stats actually mean? What is Impact? Force? Hell, what does armor even do? Don’t worry. Here we go.
Health Stats
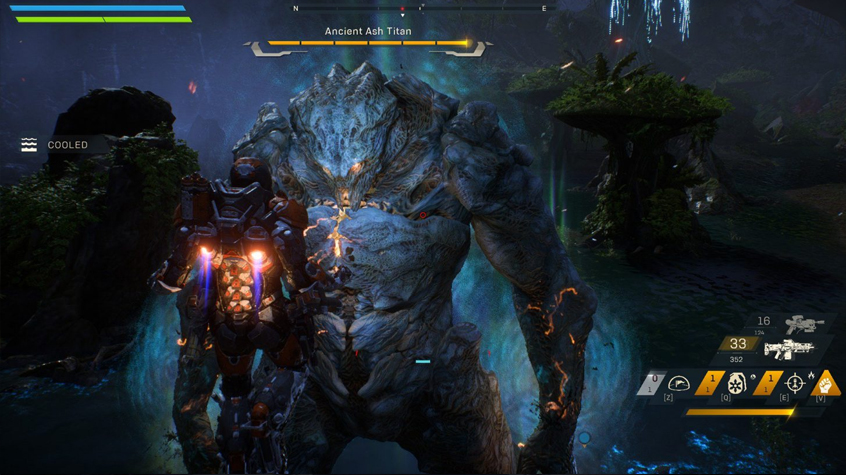
Firstly and most importantly, the two types of ‘Health’ are Armor and Shield. Armor is the green bar, and represents your raw health pool. It does not regenerate until you are out of combat completely, and can only be recovered by collecting red Repair Packs on the ground. It takes less damage from most Elemental damage types, and more from Physical damage types (more on those shortly). Armor also takes more damage from Armorcracker abilities and less damage from Shieldcracker abilities (obvious, but worth explaining). It’s also the only part of an enemy’s health bar that can be primed with an element for a combo.
Meanwhile, your Shield is the blue health bar that does regenerate after a short time. This regeneration can be improved by two stats; %Delay, which reduces the delay before your shield returns, and %Refresh, which increases the speed at which it regenerates.
Shield takes more damage from most Elemental damage types, and less from Physical damage. It cannot be crit whatsoever, and blocks the target from being primed for a combo (though they can still be detonated if they were previously primed without Shield).
Damage Types – What’s Up with Those?
On to damage. It’s delivered in a couple ways, namely Impact and Blast. Impact is direct damage, such as primary weapons and guns of all kinds, except the Grenade Launchers. Blast is explosive, or AOE damage. You’ll see %Impact and %Blast buffs on equipment, so it’s worth knowing that these are buffing your damage directly (depending on what you are using).
This is probably a good time to explain what is going on with those damage types. There are three Elemental types, and two Physical types.
The Elements are:
- Fire, which does a little more against Armor (+25%) and a little less against Shields (-25%). It’s the only element that does more raw Health damage, in fact – making it ideal against both bosses and chaff enemies, as neither tend to have Shields. Fire damage also ticks over time, with a slight burn effect.
- Ice, which does slightly more damage against Shields (+25%) and less against Armor (-25%), the opposite of Fire, fittingly. It also has a good chance to Freeze enemies solid, but remember that you can’t prime enemies with elements if they still have their Shields up.
- Thunder (or Electricity for those raised on Pokemon), which does significantly more damage (+50%) to Shields, and significantly less (-50%) to Armor. It also jumps between targets, doing a little more damage to groups of enemies.
The Physical types are:
- Impact. This is your raw Physical damage type, doing -50% less damage to armour and -25% less damage to Shields. It’s what most guns do, as well as your melee attacks and some abilities.
- Acid. Weirdly, not an Elemental type at all. This does significantly (+50%) more damage to Armor, and significantly (-50%) less damage to Shields. It also reduces enemies’ resistances, making all damage increase against them.
Now, that’s a lot of things to think about, but more or less: Ice and Electricity cut through shields, while Fire and Acid do more damage to Amour. That’s fairly logical, and definitely worth taking into account. Remember that all of the bosses we have seen so far have no Shields at all, so Acid and Fire are great against them. Meanwhile, Ice and Electricity are amazing at cutting into Elites and their Shields.
What about All Those Other Buffs?
Now, there are a lot more buffs besides those that can appear as Inscriptions on weapons when they drop for you. Most of those buffs are self-explanatory, like +Combo% means more Combo damage, anything with +Speed% means it will make that ability come up faster, +Crit% means you’ll do more damage with critical hits.
Damage Buffs
However, there are some really obscure ones that I’ll go over here because they can be very useful to know about. Firstly, just a reminder that Impact is single-target physical damage, and Blast is AOE, multiple-target damage of all kinds. Melee obviously refers to your hand-to-hand abilities, while Guns refers to your Primary Weapons.
As for the more obscure ones, +Aim% will make that weapon more accurate. +Clip% means larger magazine sizes on weapons, and +Ammo% means you can hold more of that weapon’s ammo type. +Force% is another unusual one that you’ll see often, and simply increases your chance to knock enemies down. Meanwhile +Fire Rate%, and +Damage% are buffs that do what they say on the tin, and are easily the biggest buffs to weapon damage that you can get, so aim for those.
As for your Skills, you’ll often find +[Keybind] Dmg% buffs, which buff whichever ability you have bound to that key. You can also find +Speed, which reduces the ability’s cooldown time, and +Charges which increase the number of times you can cast an Ability per cooldown. Again, you’ll be looking for +Dmg for your abilities, but +Speed is great, too.
As for the weirder, lesser-known buffs, Shieldcracker and Armorcracker are very rare. Shieldcracker is the broken blue symbol, and is only currently found on the Ranger’s Pulse Blast. It has the same damage buff against shields as Electrical damage, but without the Elemental effect or priming the target. Meanwhile, Armorcracker is the same but for against Armor (who would have guessed it?), receiving the same damage bonus as Acid. It’s shown as the broken white shield icon, and is found exclusively on the Colossus’ Railgun, and the Interceptor’s Plasma Star.
Finally, you’ll see +Combo% damage increases, and those largely do what they say on the tin. It does appear that these buffs are twice as strong on the Ranger and Colossus at this time, but we’re not sure if that’s intended. If you’re running a primer/detonator combo, this is a great stat to pick up.
Drop Improvements and Farming
Onto some of the buffs that improve your drop ratios. +Luck% is a buff to the chance of rare items dropping (loot!), while +Ammo Drop Rate means more likelihood of green Ammo packs, and +Repair Drop Rate the same for red Health packs. +Supply Drop Rate affects both of those packs. You can also improve those drops with +Amnt% buffs, but they aren’t even nearly worth having over damage buffs. Other quite useless stats include +Pickup Radius, which simply isn’t worth taking.
You can, however, look out for +Harvest% buffs, as sometimes you’ll want to keep hold of these for farming runs in Free Play to generate crafting materials as quickly as possible!
Base Damage and Scaling
Just a final word on damage and scaling, too. There are a lot of things that scale off your highest equipped item. These include: Melee Attacks, Ultimate Damage, Damage-Over-Time Effects (Fire, Electric) and any Masterwork Procs and Effects. This even affects Combo damage.
For these things, simply equipping a more powerful item will improve your damage with them, as well as any %-based buffs/inscriptions in your gear. This means that a Javelin with all white, Common items and a single Legendary would still be dealing massive damage with its Ultimate, Melee attacks, and combos. It’s also why you can pretty much access Grandmaster One as soon as you unlock a Masterwork item, as it will jump your scaling considerably.
Did You Remember All That?
That’s a huge amount of stuff to remember. But hopefully it’s cleared a lot of questions up about what stats do and which ones you should be looking for. Largely, you’ll want damage buffs, but it’s always great to keep in mind what the elements actually do so you can use them at the right time.
Remember, you can only really Combo targets without Shield. Fire and Acid are great versus raw Armor, while Electricity and Ice damage will tear through Shields. It’s starting to look like we’re going to see a lot of Fire + Electricity builds, as those two types will allow you to deal with most targets, and are available to all Javelins.
We should have a much easier time getting to the Inscriptions we want after the buffs, too. That means more damage and better clears, and all of that means more and more loot. The recent patch was great, and with further improvements coming to loot in March, it’s only going to get better.
Alright, that’s it for today’s Loot and Stats Guide. I hope it helped you get to grips with exactly what all those words mean in Anthem! If it did help, drop us a Like, and if you have any further questions, feel free to drop them in the comments section below.
Subscribe for more Anthem content coming right your way. Thanks for stopping by. I’m FaultyOptics, and I’ll see you all next time for more gaming guides and news.
Hungry for more Anthem? Check out our other coverage:
ANTHEM – NEW PLAYER SURVIVAL GUIDE (LAUNCH READY)
ANTHEM: THE FINAL VERDICT – OUR REVIEW
No related posts.





[…] ANTHEM NEW LOOT AND STATS GUIDE […]
[…] ANTHEM NEW LOOT AND STATS GUIDE […]
[…] ANTHEM NEW LOOT AND STATS GUIDE […]